Log Lamp 2: Cut it out, Pat.

Okay, so this idea came out of a similar concept I saw on Reddit a couple weeks ago, but I thought it would look a whole lot cooler if I improved the design a bit (no offense, Reddit guy) and used a cedar log that had a little more character.

Disclaimer: This project was a hell of a lot more labor-intensive than I initially thought. If you’re going to try to build this thing, prepare for a (rewarding) challenge.

Finished product, for those tl;dr folks out there:

Wood Lamp #2


The Build:

20150425_131425

Drilled two holes all the way through to mark the center for later cutout.

Time to hand-sand each cookie. (Hope you like hand cramps!)

Time to hand-sand each cookie. (Hope you like hand cramps!)

Use those two initial holes to cut out the center circle of each cookie with a jigsaw.

Use those two initial holes to cut out the center circle of each cookie with a jigsaw.

Drill three continuous holes through all of your wood pieces. These are where your dowels will (hopefully) fit.

Drill three continuous holes through all of your wood pieces. These are where your dowels will (hopefully) fit.

I used two coats of polyurethane, with a light sand in between. My thinking was that the shine would help throw the light better.

I used two coats of polyurethane, with a light sand in between. My thinking was that the shine would help throw the light better.

Ran into a bit of a problem with a faulty switch I bought from Home Depot (how could you let me down??), so I took one off a white chord I had on hand and wired it in. Oh well, it's...unique...?

Ran into a bit of a problem with a faulty switch I bought from Home Depot (how could you let me down??), so I took one off a white chord I had on hand and wired it in. Oh well, it’s…unique…?

Inserting the dowels. These were a very tight fit, and I had to sand them down a bit to make it work. The advantage of the tight fit is that I don't have to use any glue or fasteners for this project.

Inserting the dowels. These were a very tight fit, and I had to sand them down a bit to make it work. The advantage of the tight fit is that I don’t have to use any glue or fasteners for this project.

This slideshow requires JavaScript.

**For those concerned about the potential fire risk of a wooden lamp, I was too. To that end, I used a smaller, cooler-burning CFL bulb and styrene lampshade paper liner. In addition, the paper doesn’t continue through to the bottom, which allows air to reach the bulb and any heat to dissipate. Thanks for reading!

(S)crap Cedar Log Lamp

I’ll admit, I started building this lamp because the other design I had in mind was a little too complicated. I started that one a couple days later anyway, but it’s not done yet so I guess I’ll post this one. This design is easier, and you can do it in maybe 2 days, tops, minus drying time (provided you have a cedar log and a chainsaw lying around).

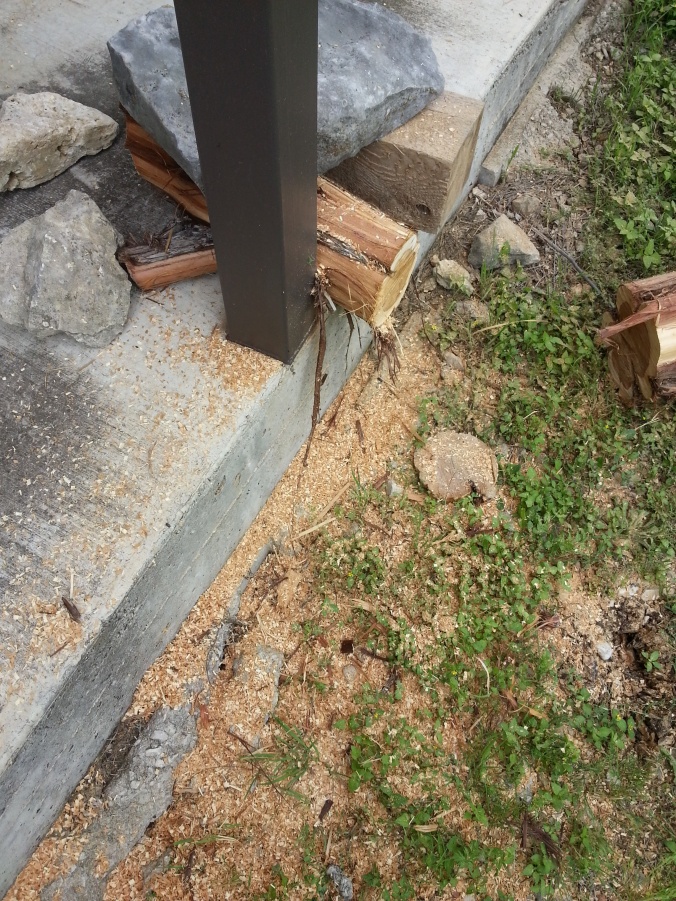
Start with a cedar log, and brace it somehow to make your cuts. (Rocks and pillar not recommended)

Start with a cedar log, and brace it somehow to make your cuts. (Rocks and pillar not recommended)

Admire your beautiful cedar cookies.

Admire your beautiful cured cedar cookies.

Sand those suckers! (Belt sander not pictured, but very helpful)

Semi-sand those suckers! Leave a little roughage for looks. (Belt sander not pictured, but very helpful)

Stained, and then glued with Liquid Nails. This stuff is very strong, but unlike normal wood glue you have to let this sit for about a week to reach its full strength.

Teak oil finish, and then glued with Liquid Nails. This stuff is very strong. Be careful not to get any on you.

Seriously, don't get any on you.

Seriously, don’t get any on you.

3/8'' hole drilled and threaded rod inserted. Pro-tip: Wrap some electrical tape around the end of the rod and use a drill gun to insert the rod into the wood. You'll save time and won't damage the rod's thread when you drill.

3/8” hole drilled and threaded rod inserted. Pro-tip: Wrap some electrical tape around the end of the rod and use a drill gun to insert the rod into the wood. You’ll save time and won’t damage the rod’s thread when you drill.

Time to wire!

Time to wire!

Underwriter's knot before wiring. Remember that the ribbed wire (wide prong) is your neutral, while the smooth wire (narrow prong) is your hot.

Underwriter’s knot before wiring. Remember that the ribbed wire (wide prong) is your neutral, while the smooth wire (narrow prong) is your hot.

All wired up with the bulb in place.

All wired up with the bulb in place.

My roommates were out and I was bored so I went to Lowe's and ended up picking out this lampshade for $5.  I actually kinda like it.

My roommates were out and I was bored so I went to Lowe’s and ended up picking out this lampshade for $5. I actually kinda like it. Also, I added some very small dowels on the bottom that allow it to sit evenly.

Worst. Photoshoot. Ever.

Worst. Photoshoot. Ever.

Anyway, easy project that will impress anyone who’s never wired a lamp before. And trust me, if I can do it, so can you. Stay tuned for another (slightly more complicated) DIY cedar log lamp!